background

Wednesday, March 28, 2012

Girlfriend Blend Set

Just a quick post before I collapse into my bed.  I finished this card this evening and couldn't wait to get it posted to share with you all.  This is one of the new 2012 sets just released and now available at www.artimpressions.com   I recently purchased all 4 new sets (Thank you to The Mercantile Store in Pendleton, SC) and my goal is to get all 4 done and posted here asap.  You will love the new girlfriends!
So before my face hits the keyboard.....drum roll.....


Girlfriend Blend Set

Ink:  Memento Tuxedo Black
         Archival Ink Coffee

Stamp:  Art Impressions Girlfriend Blend Set UM-4132

Copic Markers:
            Skin:  E000, E01, R02, R14
            Hair:  Blonde Y32, Y38
                      Red:  YR14, YR18
                      Brown: E21, E13, E19
            Clothes, jewelry:  RV02, RV06, RV09
                       YG11, YG25, BV00, BV02, B00, B02


Tuesday, March 27, 2012

Spring has Sprung

I am doubling up on a post.  The challenge this week on Art Impressions blog is "Spring has Sprung".  Well I have been thinking on this one for a couple of weeks (like Winnie the Pooh, think, think...think think think!) and it was a true challenge for me. 
 I didn't want to do the typical flowers and stacked Spellbinders (though I do like that look in a card) but with the title "Spring has SPRUNG" I felt it needed more with a feeling of how I feel as spring has blossomed here, and so early, and so many blooms! (Sympathy to those with pollen allergies) So I will delay no longer.  Here is the card, it folds to fit in a standard A2 envelope and I purposely left off any 3D embellishments so that it folds flat.  Also, the bushes were created by using the tree stamp.
I am including the youtube video that demonstrates how to do the fold. Very easy and simple. I hope you like this post....and any questions on how I did this, just leave me a comment and I will respond, I promise.  Also if you would rather email me, or have problems leaving a comment, my email is www.maryfwitter@gmail.com  Thanks for looking!


Spring Has Sprung


Recipe:

Spring has Sprung
Ink:  Memento Tuxedo Black
Stamps:Art Impressions Giant Oak Tree (Sku#T1584)
             Art Impressions Evelyn (Sku#T3519)
             Art Impressions Cloud F-2385
             Inky Antics verse  K5-3093-3F 
Punches:Martha Stewart Fence M284101
              M.Stewart Wild Flowers 42-8005
               M.Stewart Tulip Garden 42-40027
Copic Markers:
W2, W4, W5  (camera & binoculars)
E000, E02, R02, R14 (skin)
YR12, YR15, YR24 (hair)
YG93, YG97 (shirt and shoes))
E41, E43, E44 (shorts and socks)
YG21, YG23, YG25, G94
E21, E23, E25 (tree)
R14 (tulips)
BG0000 (glasses, etc.)
B21 (clouds)
R27 (flowers on bushes)
R14, Y19, BG23 (flowers behind fence)


March Tri-Fold Card.wmv

Wednesday, March 21, 2012

Designing Diva's Blog Hop

Welcome to my blog...blog hoppers! I hope you will take the time to view some of my previous postings.  I started blogging in May of 2010 and have added almost 160 posts.  I have been asked what medium is my favorite and my answer is, "When I am using Copics, it is my favorite; but when I am watercoloring, it is my favorite!".  What a conundrum... I posted today a watercolor and of course, it is my favorite! I use Art Impressions method of watercolor using Marvy Markers, a pallet and #5 brush. If you are not familiar with this technique I have included a video by Bonnie Krebs, owner of Art Impressions stamps.   Happy Blog Hopping! Next stop:  chrissyd723.blogspot.com


Kite


Kite Recipe:
Stamp:  Joanna Sheet "Kite" FW905
Marvy Markers:
#2 Red
#12 Grey
#13 Ochre
#17 Steel Blue
#20 Magenta
#27 Olive Brown
#30 Rosewood
#36 Manganese Blue
#45 Sepia
#50 Ultramarine
#57 Rose Pink
#72 Pine Green
#75 Sky Blue
#96 Jungle Green
#100 Sapphire
#107 Eggplant
Watercolor paper 140#
Judikins MicroGlaze (to seal)

Tip of the day:  I just went to Office Depot to pick up a 1" binder for 8'1/2" x 11" papers and the least expensive I could find was $4.69 and I wanted to get at least 3.....well I loaded up my arms and walked around the aisle cap and low and behold:  1 case of 12 binders 1" for $29.99. What A DEAL!
Then when I checked out (I had picked up a desk calendar too) the total was $26.48 with tax. Well, the case of binders had an instant savings of $10. So I got 12 binders for $19.99....or $1.66 each! I love surprises that save me money, don't you!


Sunday, March 18, 2012

Monochromatic card

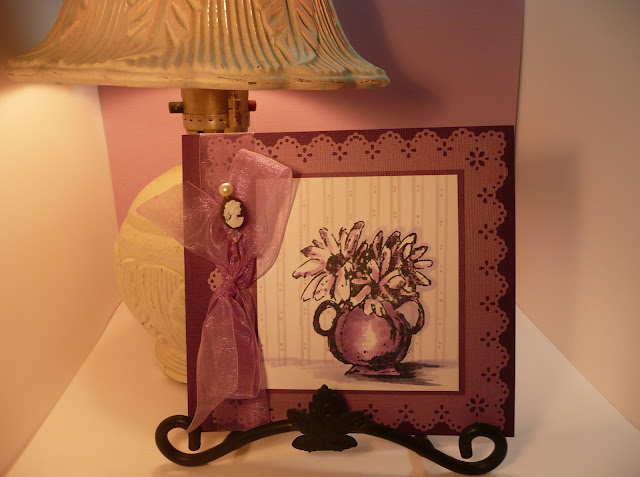
Since I was not able to sleep last night (another night of thunderstorms and a dog who goes bonkers when it rains) it was the perfect opportunity to work on my blog assignment for Art Impressions....due on Wednesday. This week the challenge is "monochromatic"...all one color/shade.  I chose this potted daisies Art Impressions stamp (of course) and picked violet as a color I felt would work best. (My favorite is blue/green but I had done that before).   I liked the calmness that violet and blue violet created. I should add that in order to create the background, I used a watercolor trick and created a mask with masking paper, then completed drawing in the "wallpaper" with copic marker and ruler. The masking made it easier for me not to have to worry about making a line in the wrong place. Leave me a comment if you need more information on masking. Be glad to help....

Monochromatic card
Recipe:
Stamp:  Art Impressions TC Pot of Daisies (Sku#M2608)
Ink:  Memento Tuxedo Black
Punch:  Martha Stewart Eyelet Lace PATP 42-60013
Copic Markers:
V12, V15, V17, BV000, BV02, BV25, BV29, V91
Bazzil Paper: Heidi, Jubilee, Velvet

Wednesday, March 14, 2012

Happy Birthday with Honey Pop

Grandson #3 who lives in Texas is about to have his birthday, March 31st, so trying not to procrastinate.  I have just finished his card.  Ever since Tim Holtz used HoneyPop paper on his February tag, I have been anxious to try it out on a card.  I purchased the paper and stamps to use with it from Inky Antics.  So here is my first pass at it....


Card Front


         Card Inside

Stamping Tip:
This stamp set is a clear acrylic set and I don't know about you but I hate it when my clear stamps get stained and I can't get them clean.  Well I was watching a YouTube video where the stamp set used was a clear set and I wondered why she was inking it up with a VersaMark Ink when that was not called as being used.  I figured it out....if you stamp FIRST with VersaMark and then with the colored ink it doesn't stain and the stamp is clean as new after a quick cleaning. Who would of ever known.....I sure didn't.


Recipe:

Ink:  Memento Tuxedo Black

Stamps:  Inky Antics 11026MC Cupcake Birdy

Spellbinders:  Classic Scalloped Ovals Small
                       Classic Ovals Small
Punch:  Martha Stewart Swirling Lace 42-60051

Paper:  Inky Antics HoneyPop collection

Copic Markers:  R32, R37, R39, R81, R83, R85, B00, B12, B16, G21, Y19

Tuesday, March 13, 2012

It's in the mail!

Us Copic-holics are always looking for a better and more convenient way to carry our stash of markers, especially if you already have them all and can't leave home without them, like me. Well, I found my solution at www.oozak.com. And true to Rusty's customer service it is already in the mail!
Here is what is coming: (copied from the Oozak website)

COPIC Carrying Case


Finally, Copic developed a perfect solution. This soft-sided carry case is sturdy, with reinforced sides,
yet holds the markers compactly. The COPIC team filled one of these cases and started turning it
upside down, shaking it, tossing it around, and it held all the markers in place nicely! In fact, the
Copic carry case can hold up to 380 Sketch markers...that means your entire collection, plus room
for a few of your favorite inks or other pens. The markers sit in six removable mesh cups that allow
you to hold Sketch, Ciao, Copics, Inks or Wide markers with ease. So, if you like to take ALL your
markers with you, then this is going to be your best, compact solution. The top zipper closure and
shoulder strap make transporting your Copic collection a breeze.


Marianne Walker says "I can't tell you how excited I was, yet, I didn't like the idea of having my
markers unorganized in little cups, so I thought of another solution. If you already have your markers
in the plastic marker cases, and you only have a couple hundred markers, not the full collection, you
can just pull out the carry pouches and it will easily hold your existing plastic cases. I like this because
my markers live on my desk in plastic cases but if I want to take some somewhere, then I don't have
to un-organize them and put them in the cups if I don't want to. If you use 36 pc. plastic cases (like I
did for this photo), you can hold 288 markers. Not bad! Otherwise, it holds 3 of the 72pc. cases, with
spare room on the sides for other tools.
"Weight: 3.5 pounds; Dimensions: 16.5" x 10" x 7.5"


(from Oozak.com website)


I store my markers in the plastic display case and the measurement of the
display case is 16" x 10" x 6". I am hoping that the dimensions given are
accurate and transporting my markers will be so much easier and less
likely to spill and cause me time putting them back in order. I will let you
know if my new purchase works! To be continued.....

Update:  Well my plastic display case was the right measurement but I
 didn't figure in that they rounded the corners on the case so it didn't work.
I don't mind the cloth bags to sort the colors but they are not in order so I
had to give that up for the ease of carrying all my markers.  Conclusion:
I really like the bag.  It is confortable on my shoulder and lets me have both
hands free.


Monday, March 5, 2012

Glitter Ritz with Peel-off stickers and Scor Tape

This past Saturday, I had the opportunity to take a class with some friends learning the technique using Glitter Ritz and Peel-off stickers. I enjoyed learning a new technique (haven't been a fan of glitter) but this was really fun and easy to get good results.
It is a little confusing at first because it involves a sticky transfer paper and then a special double stick tape. Our teacher was very patient and gave clear instructions so we all sailed right through the process.
The first card is colored totally with glitter:
Bowl of Cherries
The second card uses the same process but the image and background is colored using Copic Markers:


Here is a video from Hanko on the process of this technique and the supplies needed:


I really like this process because it doesn't require the tedious removal by hand of all the pieces of the sticker. What do you think? Leave me a comment as to your choice.
Enjoy!